Laurel Electronics
Call (714) 434 6131 for Product Assistance
Panel Meters - Counters - Timers - Transmitters, 4-20 mA & Modbus - Ethernet - USB - RS485 - RS232

Instrument Setup Software for Series 1 Laureates

Digital Panel Meters, Scale Meters, Counters, Timers, and 6-Digit Remote Displays.

Applicability

This web page describes Laurel's Windows-based Instrument Setup software when used with Series 1 digital panel meters, weight / scale meters, counters, timers and remote displays, which were shipped prior to mid-2007. The software recognizes these legacy products and bring up the appropriate computer screens, which are somewhat different than the screens for Series 2.

Setup Overview

Setup of the Laureates entails the placement of plug-in jumpers to set ranges at the hardware level, followed by programming. Programming can be in three ways:

  1. From a computer running Instrument Setup software and connected to the instrument via RS232.
  2. From the instrument front panel as guided by Instrument Setup software, with no connection to the instrument via RS232.
  3. From the instrument front panel using the printed user manual and no computer assist.

Method 1 is the easiest and makes full use of the graphical user interface (GUI) provided by Instrument Setup software. When the computer is connected to the instrument, the software recognizes the type of instrument and only brings the appropriate screens and menu choices. Clicking on any item brings up a detailed help screen for that item. Setup files can be retrieved from the instrument or from disk. Edited setup files can be downloaded into the instrument (and be saved to disk.

Meter board with USB Type-B connector

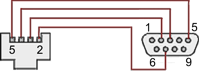
RJ11-to-DB9 cable with rear view of DB9 connector to PC
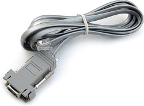
Laurel USB cable, P/N CBL05

CBL01 RS232 cable

For connection to a PC, each Laureate must be equipped with a serial communications board and a communications cable. The wiring of the RS232 cable is shown above with end views of the two connectors. Plugging into the Laureate is the RJ11 connector of a common 4-wire telephone extension cable. Plugging into the PC is custom-wired DB9-to-RJ11 adapter, which accepts the other end of the telephone extension cable. Following setup, the communication board may be removed from the meter.

To install, download IS3_3_0.exe software from this website at no charge. Double-click on the downloaded file to unzip into a special directory, such as c:\temp. Within that directory, double-click on setup.exe, which will install the software on your PC. You may wish to paste a shortcut of the executable file Instrument Setup.exe onto your desktop.

DPM Setup

Click on any of the screens for a full-size screen view, then click on the Back button of your browser to return to this page.
Laurel Dual Channel Pulse Input Rate Meter

Welcome Screen

From the Windows desktop, click go to Start > Programs > IS2 > IS2. This welcome screen will be displayed for two seconds. You can also paste the IS2 icon on your Windows desktop.

Communications Selection Screen

Specify your desired communication protocol and the serial communications bus type, which should match the jumper setup of the instrument. Select None if the PC is not connected to the instrument.

Com Port & Baud Rate Selection Screen

To establish communications, specify the computer Com port and meter baud rate. The default Laureate jumper setting is for 9600 baud. In the event of success, as indicated by a green field, click on Main Menu.

Setup File Selection Screen

Under the File pulldown menu, you are give the opportunity to open a Default setup file from disk for your type of Laureate, to Open a previously saved setup file from disk, or to Save an edited setup file to disk. Under DPM, you can Get the setup file from the meter or Put an edited file into the meter.

Jumper Setup Screen

Under the Jumpers pulldown menu, you are presented with the jumper positions and electrical connections for Laureate plug-in modules: DC, Temperature, True RMS, Load Cell, Power Supply, RS232, and RS485. The example to the left is for the DC signal conditioner board.

DPM Setup Page 1

When you click on View > Setup, the DPM Setup Page 1 is displayed. Each of the yellow fields is a pull-down menu. In the example to the left, the signal conditioner is selected as SD, and the range is selected as 0.2V.

Comprehensive DPM Help Screens

Pressing the F1 key while any of the yellow pull-down menus is displayed brings up a detailed help screen for that field. The example to the left is for the Resolution field.

DPM Setup Page 2

When you click on the Page 2 button and have specified a "loaded" meter in Page 1, this second DPM Setup screen is displayed to set up signal filtering, external inputs, and alarms. There are again multiple pull-down menus. Clicking on any of the white fields changes this field to green, and a small new window appears so that you can input the value for that field. The example to the left includes the window to inputDeviation for Alarm 1.

Simplified DPM Setup Page 2

When you click on the Page 2 button and have not specified an alarm output option in Page 1, a much simplified second DPM screen is displayed. The example to the left includes the Filter and External Input fields, but does not include any of the Alarm setup fields.

DPM Setup Page 3

When you click on the Page 3 button and you have specified a "loaded" meter in Page 1, this third DPM Setup screen is displayed to set up serial communications and analog output, and to specify any meter lockouts. The example to the left includes the window to input the meter reading for the analog output High Reading (10V if voltage output is selected).

Simplified DPM Setup Page 3

As an aid to programming the meter from the front panel when a serial connection is not available, you can return to the Main Menu and click on View > Menu. The required sequence of front panel screens will then be displayed. Click on any step in the sequence for the meaning of each digit, as illustrated for the FILtEr step. For a hardcopy, simply press on Print.

Front Panel Setup Screens for DPMs

When you click on View and select Menu, the sequence of front panel steps required for meter setup is displayed. This allows Instrument Setup software to be of benefit when there is no connection between the meter and computer. All entries made under Setup View Pages 1-3 are reflected. Clicking on the Printer button causes front panel steps to be printed.

Comprehensive Help Screens

Clicking on any step of the Menu View sequence brings up a detailed Menu Help window. The example to the left shows the meaning of each digit in the SEtuP step. With this type of detailed help, there is much less need to refer to a manual.

Counter Setup

The initial steps, choice of Setup of Menu screens, general operation, and context-sensitive help for the Laureate counter are as for the Laureate DPM. Click on any of the reduced screens for a full-size screen view, then click on the Back button of your browser to return to this screen.

Counter Setup Page 1

This page allows you to specify the type of main board (basic or extended), the signal conditioner (dual pulse input, V-to-F converter, or quadrature), and any relay option, communications option, or analog output option. Except for these hardware differences, the capabilities of Laureate digital counters are specified via this setup screen and two other setup screens.

Counter Setup Page 2

This page allows you set up Channel 2 of Laureate electronic counters as well as two alarms. As for digital panel meters, clicking in any yellow field produces a pull-down menu with choices. Clicking in any white filed brings a data input window. Pressing the F1 key for any field brings up a detailed help screen.

Counter Setup Page 3

This page allows you set up external input, serial communications, an analog output proportional to the display (optional), and lockouts for Laureate digital counters. The grayed out area at the top right of the screen applies to Laureate remote displays.

Front Panel Setup Screen for Digital Counters

If you click on View and select Menu, the sequence of front panel programming steps is presented on the computer screen. All entries made using Setup View Pages 1-3 above will automatically be reflected. Clicking on any step in the sequence will bring up a detailed Menu Help window. The example to the left shows the meaning of each digit in the Gate Time GAtEt step.s

DPM & Counter Calibration

Click on any of the reduced screens for a full-size screen view, then click on the Back button of your browser to return to this screen.

For absolute calibration, the Laureate must be connected to an external standard and to a PC running Laureate PC Setup & Calibration Software. The initial step is to establish serial communications between the PC and DPM or counter, as described for DPM setup. (Special calibration software is required for Laureate temperature meters and DC, strain or loadcell meters used in ratiometric bridge mode, as described in a separate calibration page and software download page).

DPM Calibration Main Menu Screen

From the Main Menu screen, click on Calibration on the top menu bar. The software will recognize the type of Laureate DPM (DC meter, True RMS, load cell meter, scale meter, or temperature meter) and bring up the appropriate calibration screen.

DC Signal Conditioner Calibration Screen

The DC Signal Conditioner Calibration screen is an example of a Laureate DPM calibration screen. It prompts the user for each range to be calibrated, displays the required jumper settings, and prompts for the signals to be applied from an external calibrator. Click on the screen to the left for additional details.

Frequency Meter Calibration Screen

Calibration of the quartz crystal of the Laureate counter with dual-channel frequency signal conditioner requires the input of a known frequency from a calibrator. Apply the frequency, then enter the frequency in Hertz. Calibration will be automatic, with storage of the calibration factor stored in non-volatile memory. Click on OK to exit.

Other Online DPM Operations

If you have a serial connection to a Laureate DPM or counter, you can perform a number of online operations from your PC.

Setup File Selection Screen for Panel Meters

Under the DPM pulldown, menu you are given the opportunity to Get Setup (or retrieve) setup data from a DPM, or to Put Setup (or download) setup data back into the nonvolatile memory of the DPM. The same setup file stored on disk can be downloaded into multiple Laureate instruments, greatly speeding up setup in a production environment.

Commands Screen for Digital Panel Meters

Under the Commands pulldown menu, after you have performed a Get Setup operation, you can command functions by using the computer mouse. You can reset individual meter functions, display current or peak readings, and enter numbers to be displayed remotely by the DPM. For the remote display, the first position must be a blank, + sign or - sign.

Graphics Output Screens of Digital Panel Meters

Under the Readings pulldown menu, you can select three formats to display the DPM data on the computer screen:

  • List presents the latest readings in a 20-row by 10-column table. Press pause at any time to freeze the display. This is one method to capture peak readings.
  • Plot generates a plot of readings vs. time in seconds. It effectively turns the DPM-PC combination into a printing digital oscilloscope.
  • Graph generates a histogram where the horizontal axis is the reading and the vertical axis is the number of occurrences of readings. The display continually resizes itself as the number of readings increases.
Legal Information
seal-20th24    
facebook   G+   twitter   linkedin
© 1990-2024 Laurel Electronics
feedback